
Replacing your BMW F25’s battery is a routine maintenance task, typically needed every 5 years. Modern BMWs, like the F25, are sophisticated vehicles highly sensitive to battery health. Issues can arise from a failing battery, often indicated by stored codes and diminished performance. If you’re experiencing similar symptoms with your BMW F25, it might be time for a battery replacement. This guide provides a detailed walkthrough, emphasizing the critical step of battery coding using tools like Carly, ensuring your new battery functions optimally and prolongs its lifespan.
It’s crucial to select the correct replacement battery, paying attention to type, capacity (Ah), and Cold Cranking Amps (CCA). Most BMWs, including the F25, utilize AGM (Absorbent Glass Mat) batteries known for their spill-proof and robust design, ideal for demanding vehicle electronics. While matching the original battery specifications simplifies the process, slight variations are acceptable, but require proper coding to inform your BMW’s intelligent battery management system. This system adjusts charging parameters based on battery specifications, age, and type to maximize battery life and system efficiency. Skipping battery registration and coding can lead to suboptimal charging, reduced battery life, and potential electrical issues.
For those opting for DIY battery replacement and coding, tools like Carly offer a user-friendly and cost-effective solution. While professional tools like ISTA+ and E-sys are also viable options, Carly simplifies the coding process, making it accessible for BMW owners to manage their car’s maintenance at home.
Step-by-Step Battery Replacement Procedure for BMW F25
Before commencing, ensure you have the correct replacement battery and necessary tools.
Tools You’ll Need:
- New AGM Battery (Correct Ah and CCA for BMW F25)
- Socket wrench set
- Flathead screwdriver
- Trim removal tool or cats claw
- Carly adapter and app (or ISTA+, E-sys with OBD to ENET cable)
- Gloves (recommended)
Safety First: Ensure the vehicle is completely powered down, ignition fully off, and any battery chargers disconnected before starting.
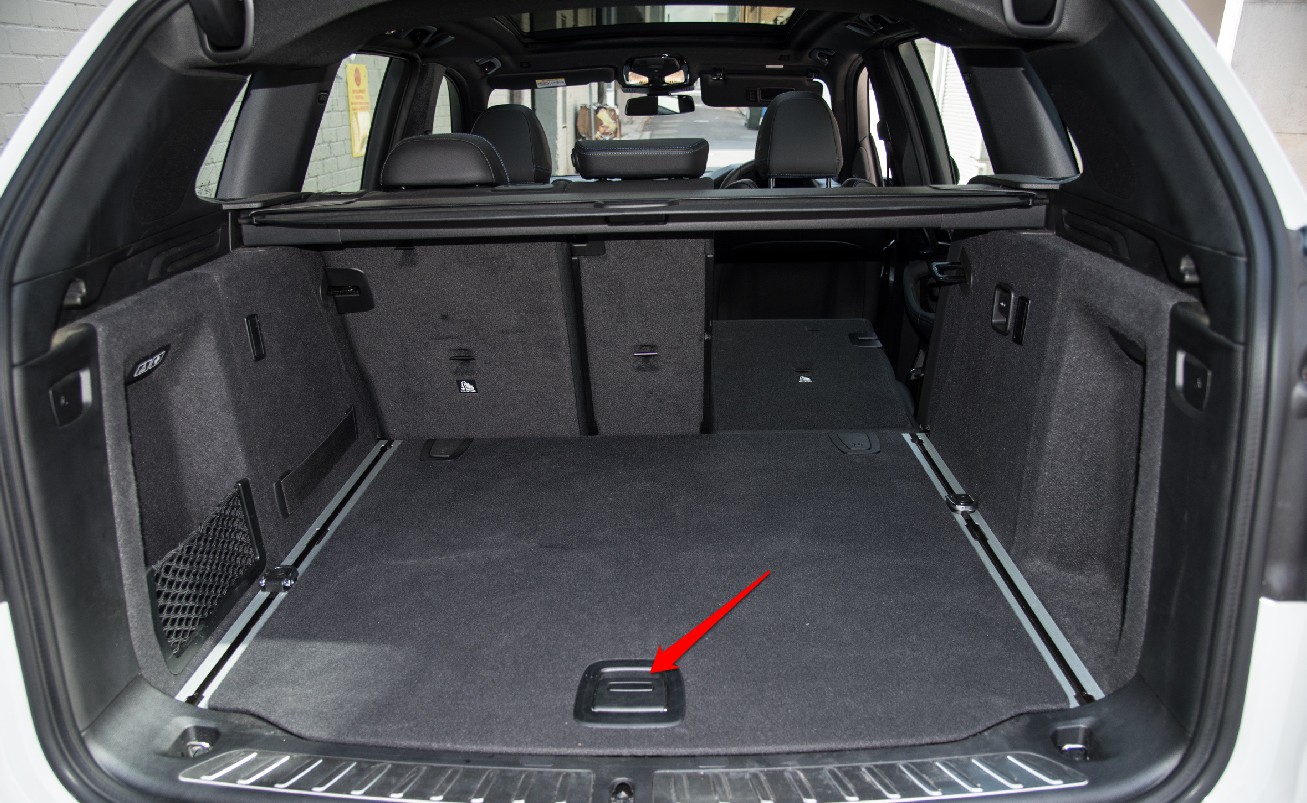
1. Accessing the Battery Compartment
Begin by opening the liftgate of your BMW F25. Locate the lower trunk liner and lift it using the handle to access the spare tire area and battery compartment.
Next, open the battery compartment cover. At the rear of the compartment, you’ll find two plastic retainers. Use a flathead screwdriver to rotate these 90 degrees. These T-shaped retainers will then slide through their slots, releasing the rear of the cover.
After rotating the rear retainers, you’ll encounter push-pin type retaining clips (typically 4). These secure the front portion of the battery compartment cover. Use a trim removal tool (cats claw or Y-shaped) for best results. A small flathead screwdriver or pick can also be used, but may damage the clips. Remove these clips to fully detach the cover.
2. Disconnecting and Removing the Old Battery
A. Reference Photo: Before disconnecting anything, take a picture of the battery and cable assembly. This serves as a valuable reference during reinstallation.
B. Disconnect Negative Terminal: Using your socket wrench, carefully disconnect the negative battery terminal (black cable, often marked with “-“). Ensure the ignition is completely off to prevent electrical issues.
C. Disconnect Power Distribution Box Cables: Locate the Power Distribution Box (the large red box situated on the left side of the battery). Disconnect all cables attached to it.
D. Detach Cable Retainers: Cable retainers are attached to the battery retention bracket. Use your trim removal tool to gently pry these retainers out. Ensure the plastic is warm to prevent breakage, especially in cold conditions. Removing these provides clearance to access the battery bracket.
E. Remove Power Distribution Box: Use a flathead screwdriver to release the metal tabs (front and back) securing the Power Distribution Box. Insert the screwdriver into the V-shaped points and gently pull away from the battery. Once the tabs are free, lift out the box. Before complete removal, ensure it’s unbolted from the Intelligent Battery Sensor (IBS). After freeing the box, disconnect the IBS and then the positive battery terminal (red cable, often marked with “+”).
F. Remove Battery Retention Bracket: Locate the two bolts (one front, one rear) securing the battery retention bracket. Remove these bolts and lift the bracket up and out.
G. Remove Battery Holders: Identify the battery holders at the bottom of the battery. Typically, there’s an L-shaped holder at the front. Remove the bolt securing it and remove the holder. Your model might have additional holders.
H. Disconnect Vent Tube: On the left side of the battery, disconnect the battery vent tube. It’s a small plastic plug connected to a vent line.
I. Lift Out Old Battery: Carefully lift the old battery straight up and out of the compartment. Batteries are heavy, so use proper lifting techniques.
3. Installing the New Battery
A. Install Vent Plug (Negative Side): Before installing the new battery, ensure the vent plug is installed on the negative terminal side vent. If your new battery didn’t come with one, carefully remove it from the old battery using a pick tool and install it in the new one.
B. Lower New Battery into Place: Carefully lower the new battery into the battery compartment, ensuring it’s properly positioned.
C. Connect Vent Hose (Positive Side): Connect the vent hose to the vent port on the positive side of the new battery.
D. Reinstall Battery Holders and Bracket: Reinstall the battery retention bracket and bottom battery holders. Torque the bolts to 10nm (hand-tight is generally sufficient as it’s a low torque value).
E. Reconnect Positive Terminal/IBS: Reconnect the positive terminal cable and the Intelligent Battery Sensor (IBS).
F. Reinstall Power Distribution Box: Slide the Power Distribution Box back over the threaded rod on the IBS. It should clip into place with the metal tabs on the top and bottom.
G. Reconnect Remaining Cables: Reconnect all remaining cables to the Power Distribution Box, excluding the negative battery cable for now. Bolt the Power Distribution Box to the IBS and the positive cable to the Power Distribution Box. Torque these bolts to 15nm (again, hand-tight is usually adequate). Finally, reconnect the negative battery cable.
H. Reinstall Battery Compartment Cover and Trunk Liner: Reinstall the battery compartment cover and trunk storage bin, securing them with the push pins and T-style retainers as described in step 1. Reinstall the trunk liner/lid.
4. Battery Registration and 5. Battery Coding with Carly
Battery Registration: Registering the new battery tells your BMW’s computer that a new battery has been installed. This is crucial for proper charging and battery management.
Battery Coding (If Necessary): If your new battery has a different Ah rating than the original (e.g., replacing a 105Ah with a 95Ah), coding is essential. Coding informs the car’s system of the new battery capacity, ensuring correct charging algorithms are applied. In this example, coding to the nearest available value (like 90Ah if 95Ah isn’t an option) is recommended.
Using Carly for Battery Coding:
Carly is a popular OBD-II adapter and app combination that simplifies BMW diagnostics, coding, and maintenance tasks, including battery registration and coding.
General Steps for Carly Battery Coding (Refer to Carly App Instructions for Specifics):
- Connect Carly Adapter: Plug the Carly OBD-II adapter into your BMW F25’s OBD-II port.
- Open Carly App and Connect to Vehicle: Launch the Carly app on your smartphone or tablet and establish a connection with your vehicle via Bluetooth.
- Navigate to Battery Management/Service Functions: Within the Carly app, locate the battery management or service functions section.
- Select Battery Registration: Run the battery registration function to register the new battery.
- Select Battery Coding (If Capacity Changed): If your new battery has a different Ah capacity, look for the battery coding option. Select the closest Ah value available in the Carly app that matches your new battery (e.g., 90Ah if replacing a 105Ah with a 95Ah).
- Execute Coding and Registration: Follow the app’s prompts to execute the battery registration and coding processes.
- Verify with Diagnostics (Optional): For advanced verification, you can use diagnostic software like ISTA+ to confirm the battery registration and coding have been successfully applied, as shown in the original article’s ISTA+ screenshot.
By correctly replacing, registering, and coding your BMW F25 battery, especially using user-friendly tools like Carly, you ensure optimal vehicle performance, extend battery life, and avoid potential electrical issues. Enjoy your BMW with its renewed power source!