
When it comes to secure remote access, especially in fields like car coding where data integrity is paramount, using robust tools is crucial. PuTTY, a widely-used SSH client, offers a secure way to connect to remote systems. This guide will walk you through setting up SSH key authentication with PuTTY, enhancing your security when engaging in activities such as car coding or accessing remote servers for automotive diagnostics and software modifications. By utilizing SSH keys, you’ll bypass password-based logins, making your connections significantly more secure against unauthorized access.
Let’s dive into the process of setting up PuTTY with SSH keys for a safer and more efficient workflow.
Generating Your SSH Key Pair with PuTTYgen
The first step is to create your unique SSH key pair. This pair consists of a private key, which you keep secure on your computer, and a public key, which you’ll place on the remote server you want to access. PuTTYgen is the tool for this job.
-
Download and Run PuTTYgen: Obtain PuTTYgen from the official PuTTY website and execute the
puttygen.exefile. -
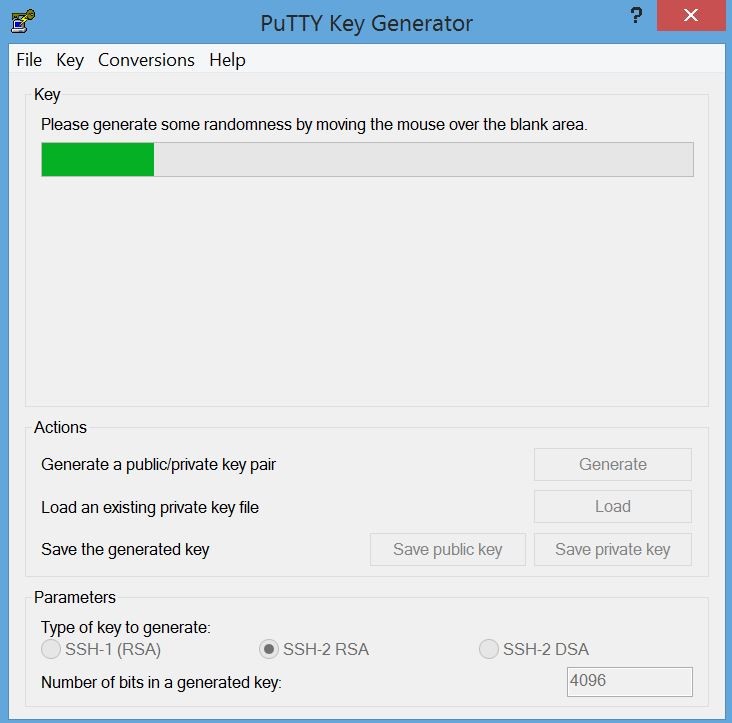
Generate Your Key Pair:
- Ensure “SSH2-RSA” is selected as the type of key to generate. For enhanced security, choose a bit size of at least 4098.
- Click the “Generate” button.
- Move your mouse around within the PuTTYgen window as instructed. This action introduces randomness, making your keys more secure.
-
Save Your Keys:
- In the “Key comment” field, add a descriptive comment to help you identify this key pair later (e.g., “Car Coding Access Key”).
- Click “Save private key” and store it in a secure location on your computer. Remember to keep your private key file safe and never share it. PuTTY private keys are saved with a
.ppkextension. - Copy the text from the “Public key for pasting into OpenSSH
authorized_keysfile” field. You’ll need this public key later. You can also save the public key to a file for backup, though the text in the PuTTYgen window is usually sufficient.
Preparing Your Public Key for the Remote Server
The public key generated by PuTTYgen needs to be formatted correctly for use on a Linux-based remote server, which is common in many car coding and diagnostic systems.
-
Edit the Public Key Format: The public key copied from PuTTYgen is in a specific format. You need to adapt it slightly to be compatible with the
authorized_keysfile on your remote server. The required format is a single line with three fields:ssh-rsa(indicating the key type)- The actual public key (a long string of characters)
- An optional comment (the “Key comment” you entered in PuTTYgen)
-
Example of Correctly Formatted Public Key:
ssh-rsa AAAAB3NzaC1yc2EAAAABJQAAAgEA5Kp+G9z8eE0MpPZL9JZksstIa3L9JEND6ud11IiD6f1jw/7Lv7CvZcCdkOVMT+DlTbryRoqfbNMLkjajqNTUGBAscTduUtPYuQtYEQgtbJdhyHtTHK9XwiKeQr7LjHZcEg3osYh+MzZFscldQMaZ26AKh81EC9XuIu98snjOBM0ysb14Uu7hMvti5Xd3kSW7ctL2j1ORuRgZX6LHihaezvsBFI5SlZ4vyxymRKQnyV6OkMNMXESJpXh3cTMIIGtDJtbbYvh5Qs0f3O1fMiQYyz2MjGphdzBihq85a1SHx0LBk31342HsCiM4elZkicmjmy0qYGShmzh1kfZBKiBs+xN4tBEyjRNYhuMGP2zgpr9PFO1buYdLah5ab3rubB5VbbRP9qmaP2cesJSN91luc099gZ+CgeBVIiRr1EYTE8TqsSBdvmu3zCuQgDVcSAoubfxjM4sm3Lb6i4k4DJmF57J6TrcyrSIP9HPDuBuYoOfSBKies6bJTHi9zW2upHqNlqa2+PNY64hbq2uSQoKZl1SxwSCvpbsYj5bGPQUGs+6AHkm9DALrXD8TXivQ+IsWEV3wnXeA4I1xfnodfXdhwnybcAlqNrEwKb3wGWdf3d8cu+mJrJiP1JitBbd4dzYM0bS42UVfexWwQSegDHawAby0MW0= rsa-key-20160822 -
Transfer and Edit (Optional): For ease of editing, especially with long keys, you might consider copying the public key text to a file, transferring it to your remote Linux machine, and then using a text editor like
vimornanoto format it into a single line if needed. This can be simpler than editing directly on Windows, which might introduce line breaks.
Configuring the Remote Server: Adding Your Public Key
Now, you need to place your public key on the remote server to authorize your access.
-
Access the Remote Server: Log in to your remote Linux server using your password (you’ll disable password login later for enhanced security once key authentication is working).
-
Locate or Create
.ssh/authorized_keys:- Navigate to your home directory on the remote server.
- Check if a
.sshdirectory exists. If not, create it:mkdir .ssh - Inside
.ssh, check for theauthorized_keysfile. If it doesn’t exist, create it:touch .ssh/authorized_keys
-
Append Your Public Key: Open the
authorized_keysfile with a text editor (likevimornano):nano .ssh/authorized_keys- Paste the correctly formatted public key (the single line you prepared earlier) into this file. If there are existing keys, append your new key to the end, each key on a new line.
- Save and close the file.
-
Set Permissions (Important for Security): Ensure that the
.sshdirectory andauthorized_keysfile have the correct permissions. They should not be world or group readable to maintain security. Use these commands:chmod 700 .sshchmod 600 .ssh/authorized_keys
Setting up a PuTTY Session to Use Your Private Key
With the key pair generated and the public key on the server, you now configure PuTTY to use your private key for authentication.
-
Open PuTTY and Load or Create a Session: Open PuTTY. If you have an existing session for your remote server, load it. Otherwise, create a new session by entering the hostname or IP address of your remote server in the “Host Name (or IP address)” field.
-
Navigate to SSH Authentication Settings: In the PuTTY configuration panel on the left side, go to “Connection” -> “SSH” -> “Auth”.
-
Browse for Your Private Key File: Click the “Browse…” button in the “Private key file for authentication” section. Locate and select the
.ppkfile (your private key file) that you saved earlier. -
Save Your PuTTY Session: Go back to the “Session” category in the PuTTY configuration panel. Enter a name for this session in the “Saved Sessions” field (e.g., “CarCodingServer-KeyAuth”) and click “Save”. This saves all your settings, including the private key authentication.
-
Connect to Your Server: Select your saved session name and click “Open”. PuTTY will now attempt to connect to your remote server using SSH key authentication. If everything is set up correctly, you should be logged in without being prompted for a password.
Enhancing Security with Pageant (Optional)
For even greater security and convenience, especially if you use multiple SSH keys or sessions, consider using Pageant, PuTTY’s SSH authentication agent.
- Pageant Benefits: Pageant keeps your private keys encrypted in memory and handles the authentication process in the background. You only need to enter your passphrase (if your private key is passphrase-protected) once when Pageant starts. After that, PuTTY sessions configured to use key authentication will automatically authenticate through Pageant without you needing to specify the private key file each time.
By following these steps, you’ve established a more secure SSH connection using PuTTY and SSH keys, which is highly recommended for sensitive operations like car coding and remote server management. This method significantly reduces the risk of unauthorized access compared to password-only authentication.