
Creating a website might seem daunting, especially if you think it always requires advanced coding skills. Platforms like Hostinger website builder offer drag-and-drop interfaces, making website creation accessible even without coding knowledge.
However, learning how to code a website using HTML and CSS offers greater flexibility and often results in faster websites due to lighter resource requirements. While it involves a steeper learning curve, coding empowers you with deeper control and customization.
This article will guide you through the process of how to code a website using HTML and CSS, perfect for beginners. We’ll also share advanced tips to enhance your HTML website’s appearance and functionality. Let’s dive in!
How to Code a Website with HTML and CSS
This section outlines all the necessary steps to code a website using HTML and CSS. If you’re new to HTML, consider checking out an HTML cheat sheet to get familiar with the basics.
1. Choose an HTML Code Editor
A code editor is software designed for writing website code. While basic text editors like Notepad can be used for HTML, they lack essential features that streamline development, such as:
- Syntax Highlighting: This feature color-codes HTML tags based on their category, making code structure easier to read and understand.
- Autocompletion: Suggests HTML attributes, tags, and elements automatically based on previous input, accelerating coding.
- Error Detection: Highlights syntax errors, allowing developers to quickly identify and fix mistakes.
- Integration: Some code editors integrate with plugins, Git, and FTP clients, improving deployment efficiency.
- Live Preview: Eliminates the need to manually open HTML files in a browser; plugins enable live website previews.
With numerous options available, here are some recommended HTML code editors to help you choose the best one for your needs:
- Notepad++: A free, lightweight text editor with added programming features and plugin support.
- Atom: An open-source HTML editor with live website preview and excellent compatibility with scripting and markup languages.
- Visual Studio Code (VSCode): A popular web development tool with a comprehensive extension library for added functionality.
2. Plan Your Website Layout
Next, planning your website layout is crucial when learning how to code a website with HTML and CSS. This step helps you visualize your website’s structure and serves as a checklist for elements to include.
A layout plan also aids in defining website usability and navigation, which directly impacts user experience. Key elements to consider include the header, footer, and navigation menu.
You can use pen and paper or web design software like Figma to design your website layout. Your layout doesn’t need to be overly detailed, as long as it captures the intended look and feel of your website.
3. Start Writing HTML Code
With your layout plan and tools ready, you can begin writing code to start coding your website with HTML. The exact steps may vary slightly depending on your code editor, but the fundamental process remains consistent.
This tutorial demonstrates how to code a website with HTML using VSCode:
- Create a new folder on your computer. This folder will serve as the directory for all your website files.
- Open VSCode → File → Open Folder.
- Locate your new folder and click Select Folder.
- Select New File. Name the file index.html and press Enter.
- Click Create File to confirm.
- When prompted to open the index.html editor tab, enter the basic HTML document structure:
<!DOCTYPE html>
<html lang="en">
<head>
    <meta charset="UTF-8">
    <meta name="viewport" content="width=device-width, initial-scale=1.0">
    <title>Document</title>
</head>
<body>

</body>
</html>
To help you understand this code, here’s a breakdown of each tag:
<!DOCTYPE html>– informs web browsers that this document is an HTML5 page.<html lang="en">– the opening tag of the HTML document, indicating the start of the code.lang="en"specifies the language as English.<head>– contains website metadata, such as character set, viewport settings, and title.<meta charset="UTF-8">– defines the character encoding for the document, UTF-8 is widely used and supports most characters.<meta name="viewport" content="width=device-width, initial-scale=1.0">– configures the viewport for responsiveness across different devices.<title>Document</title>– defines the text displayed in the browser tab when the webpage is visited. Replace “Document” with your desired page title.
<body>– contains all the visible content of the webpage.
4. Create Layout Elements
Add HTML code within the <body> tags in your index.html file to create elements based on your layout plan. Depending on your website design, you might need various HTML semantic elements.
These elements will divide your website into sections and act as containers for your content. Here are some tags we’ll use:
<header>– a container for introductory content or navigation.<main>– indicates the main content of a webpage.<div>– defines a division or section in an HTML document, often used as a container.<footer>– contains content displayed at the bottom of your website.
Place these elements between the <body> tags in your index.html code. Ensure each element is closed with a closing tag, or your code will not function correctly.
Here’s an example of the complete code:
<!DOCTYPE html>
<html lang="en">
<head>
    <meta charset="UTF-8">
    <meta name="viewport" content="width=device-width, initial-scale=1.0">
    <title>Personal Blog</title>
</head>
<body>
    <header>
        <!-- Header content -->
    </header>
    <nav>
        <!-- Navigation menu -->
    </nav>
    <main>
        <div>
            <!-- Main content area -->
        </div>
        <div>
            <!-- Sidebar or additional content -->
        </div>
    </main>
    <footer>
        <!-- Footer content -->
    </footer>
</body>
</html>
5. Add HTML Content
Once your layout is set, start filling it with website content, such as text, images, links, or videos. If your content isn’t ready, use placeholder content, which you can replace later.
Here are some tags you’ll use to add website content:
<h1>to<h6>– heading tags for different levels of headings.<h1>is the main heading, and<h6>is the least important.<p>– contains paragraph text. Use<br>tags to add spaces or line breaks if text is too long.<a>– defines a hyperlink and related elements (anchor element). Use the href attribute to specify the URL the anchor links to.<img>– a placeholder for image elements. It includes the src attribute, which specifies the image file link or name.
<!DOCTYPE html>
<html lang="en">
<head>
<meta charset="UTF-8">
<meta name="viewport" content="width=device-width, initial-scale=1.0">
<title>Personal Blog</title>
</head>
<body>
<header>
<h1>My Personal Blog</h1>
</header>
<nav>
<a href="#">Home</a> |
<a href="#">About</a> |
<a href="#">Posts</a> |
<a href="#">Contact</a>
</nav>
<main>
<div>
<div>
<h1>Newest Post</h1>
<section>
<h2>First Post</h2>
<p>This is the content of my first blog post. Welcome to my blog!</p>
</section>
</div>
<div>
<h1>About Me</h1>
<img src="profile-picture.png" alt="Profile picture of the author">
<p>Learn more about the author of this blog.</p>
</div>
</div>
</main>
<footer>
<p>© 2025 My Personal Blog</p>
</footer>
</body>
</html>After adding the code above, your first version of a website coded with HTML is ready. It will look something like this:
6. Incorporate CSS for Layout
Since HTML only allows you to structure your website and add basic content, use CSS to style its layout. CSS (Cascading Style Sheets) is a language that defines the visual presentation of HTML documents.
To do this, create a style.css file and link this stylesheet to your HTML document by adding the following code between the <head> tags in your index.html:
<link rel="stylesheet" href="style.css">To create a two-column website layout, we’ll use the flex property. This property arranges HTML elements using flexible containers that adapt to user screen sizes.
Here’s the CSS code for style.css:
/* General styles and box-sizing */
* {
box-sizing: border-box; /* Ensures padding and border are included in element's total width and height */
font-family: Arial, sans-serif; /* Sets a default font */
}
body {
margin: 0; /* Removes default body margin */
padding: 0; /* Removes default body padding */
background-color: #f4f4f4; /* Light grey background */
color: #333; /* Dark grey text for readability */
line-height: 1.6; /* Improves text readability */
}
/* Header style */
header {
background-color: #35424a; /* Dark header background */
color: white; /* White text color */
padding: 1em 0; /* Vertical padding */
text-align: center; /* Centers header text */
}
header h1 {
margin: 0; /* Removes default heading margin */
font-size: 2em; /* Larger font size for main heading */
}
/* Navigation menu style */
nav {
background-color: #444; /* Darker background for navigation */
color: white; /* White text color */
padding: 0.5em 0; /* Vertical padding */
text-align: center; /* Centers navigation links */
}
nav a {
color: white; /* White link color */
text-decoration: none; /* Removes underline from links */
padding: 0.5em 1em; /* Padding around links */
display: inline-block; /* Makes links behave like blocks but stay in a line */
}
nav a:hover {
background-color: #555; /* Slightly lighter background on hover */
}
/* Main layout container */
main {
display: flex; /* Enable flexbox layout */
padding: 20px; /* Padding around main content */
max-width: 1200px; /* Maximum width for main content */
margin: auto; /* Centers main content on the page */
}
/* Post text box (adjust flex as needed for column width) */
main > div:first-child { /* Targets the first div inside main for post area */
flex: 70%; /* Takes up 70% of the main area */
padding: 20px; /* Padding inside the post area */
}
/* Profile/Sidebar area */
main > div:last-child { /* Targets the last div inside main for sidebar */
flex: 30%; /* Takes up 30% of the main area */
padding: 20px; /* Padding inside the sidebar */
background-color: #ddd; /* Light grey background for sidebar */
}
/* Profile image style (in sidebar) */
.profile img {
width: 100%; /* Image takes full width of its container */
max-width: 150px; /* Set a maximum width if needed */
display: block; /* Removes extra space below image */
margin: 20px auto; /* Centers image horizontally and adds vertical margin */
border-radius: 50%; /* Makes the image circular */
}
.profile h2 {
text-align: center; /* Centers sidebar heading */
}
/* Footer style */
footer {
background-color: #333; /* Dark background for footer */
color: white; /* White text color */
text-align: center; /* Centers footer text */
padding: 1em 0; /* Vertical padding */
position: fixed; /* Fixed position at the bottom of the viewport */
bottom: 0; /* Stick to the bottom */
width: 100%; /* Full width of the viewport */
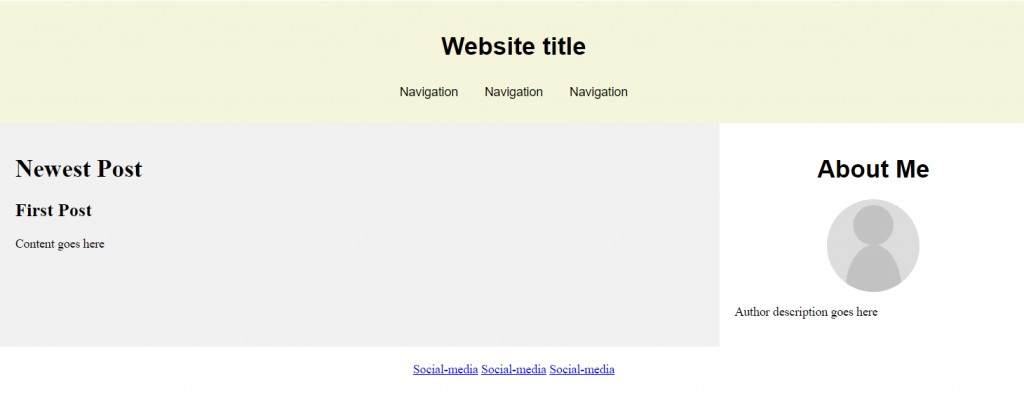
}After adding this CSS code to your style.css file, here’s how your website, coded with HTML and CSS, will appear:
7. Customize Your HTML Website’s Appearance
Beyond layout, use CSS to customize other visual aspects of your website. For example, you can change the font types and website background images.
To modify your website’s appearance, add CSS properties to the elements you want to customize. For instance, here’s the code to change the background color and text elements in the navigation menu:
/* Navigation bar style */
nav {
    text-align: center;
    word-spacing: 30px;
    padding: 10px;
    background-color: #e0f7fa; /* Light cyan background */
    font-family: 'Arial', sans-serif; /* Example font */
}

/* Navigation bar link style */
nav a {
    color: #004d40; /* Dark teal link color */
    text-decoration: none;
    font-size: 1.2em; /* Slightly larger font size */
    padding: 10px 15px;
    border-radius: 5px; /* Rounded corners for links */
    transition: background-color 0.3s ease; /* Smooth background color transition on hover */
}

nav a:hover {
    background-color: #b2ebf2; /* Lighter cyan on hover */
}
After adding CSS styling for each element, your website’s appearance will be further refined.
If you want to use different colors, replace the HTML color codes in the code above with options that better suit your preferences. You can find HTML color codes online using a color picker tool or color code charts.
What’s Next After Coding a Website with HTML and CSS?
This section covers steps to take after you’ve completed coding your website with HTML and CSS, making it more accessible and functional.
Host Your Website on a Suitable Platform
To make your website accessible on the internet, use a web hosting service. Most hosting providers offer various plans to meet different user needs.
Since HTML webpages are lightweight and require minimal loading resources, a basic shared hosting plan is generally sufficient.
Alternatively, you can use free hosting platforms like GitHub Pages to host static websites.
However, avoid free static hosting if you plan to add more code or create dynamic websites. Besides potential compatibility issues, limited server resources can slow down your website.
Add a Dropdown Menu for Improved Navigation
Complex websites with many pages often have numerous navigation buttons, links, and text. You can create a simple CSS dropdown menu to group these elements.
Users can expand the navigation bar to access these elements, improving website appearance and usability, especially for users on smaller screens.
Enhance Website Design with Advanced CSS
CSS enables advanced customizations to enhance website design and improve user experience. For example, you can implement scroll snapping, text animations, hover zoom animations, and gradients.
Furthermore, you can build responsive websites using media queries, CSS frameworks, and flexbox. Flexbox layouts automatically adjust your website to the client’s screen size, ensuring optimal viewing on any device.
Boost Interactivity with JavaScript
JavaScript is a scripting language that lets you create interactive and dynamic website content, such as animations, countdown timers, buttons, forms, or menus.
These features make your website more engaging, enhancing user experience. The steps to add JavaScript to HTML are similar to CSS. You can use separate files or write it directly into your current code.
Is Learning HTML and CSS Necessary to Code a Website?
Some users might not have ample time to learn HTML and code a website from scratch. Fortunately, several platforms allow you to create functional websites without coding.
Website builders like Hostinger Website Builder are excellent options, especially for beginners. These platforms offer visual UIs and drag-and-drop editors for easy customization.
Moreover, maintaining websites built with builders is much simpler, as you don’t need to manually update source code. Simply select the element you want to edit and apply changes directly in a visual interface.
Hostinger Website Builder is included in all our hosting plans, eliminating the need for separate purchases. Starting at $2.99/month, you get a no-code website builder that can be upgraded to higher-tier plans as your needs grow.
Conclusion
This tutorial has guided you through how to code a website using HTML and CSS.
While no-code alternatives like website builders exist, coding a website from scratch with HTML and CSS offers unparalleled customization and control. Although more complex, HTML websites are resource-efficient and flexible due to direct source code access.
Here are the 7 steps on how to code a website with HTML and CSS:
- Choose an HTML editor – select a program for writing and editing your website code, such as VSCode.
- Plan your website layout – create a website layout mockup using programs like Figma or pen and paper.
- Write HTML code – create an index.html file and add HTML document structure tags.
- Create layout elements – structure your website into sections based on your layout by adding tags to the HTML file.
- Add HTML content – populate each section with headings, text content, and images.
- Incorporate CSS for layout – create a style.css file and add CSS code to adjust column positions, text alignment, and element padding.
- Customize your website – use CSS style attributes to customize background colors, font sizes, font types, and other visual elements.
After creating your HTML and CSS webpages, you can further enhance navigation, interactivity, and overall design by adding advanced JavaScript.
Ready to code your website with HTML and CSS? Or prefer using a website builder? For a hassle-free, no-coding experience, Hostinger Website Builder is your go-to solution!
FAQ About How to Code a Website with HTML
Is HTML Enough to Code a Website?
You can code a fully functional website using only HTML. However, the content will be static, such as text, links, images, and videos.
Use CSS to enhance its appearance, like changing background colors and font sizes. For dynamic and interactive websites, you’ll also need to use JavaScript and backend languages.
Is HTML Good for Coding Websites?
HTML is quite good, especially for static websites. HTML websites are lightweight, require minimal loading resources, and are flexible because their source code is modifiable.
For complex websites, HTML must be combined with CSS and JavaScript. If you’re new to coding, consider using WordPress or a website builder for a more user-friendly experience.
How Long Does Coding an HTML Website Take?
More complex websites naturally take longer to code. The number of people working on it and their skill levels also influence the timeline. Generally, experienced developers can code a simple website in about 4-6 weeks.